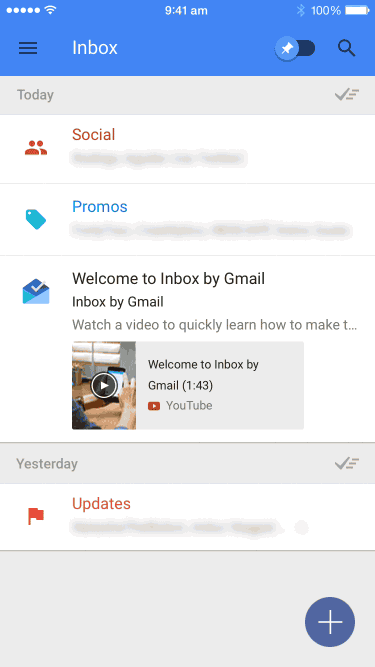
Goal
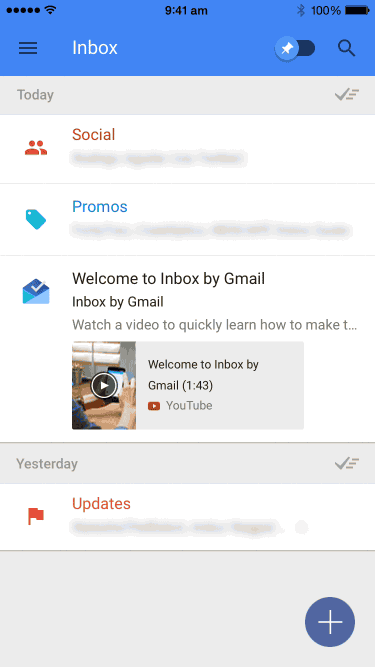
We are going to recreate the floating menu effect from Inbox by Google. The final result looks something like this:
Observations
The buttons slide out from the first
The menu buttons animate out from the first one. The labels also appear next to each menu button.
The existing context is somewhat visible
The original content is blurred as used as a background.
Prerequisites
This teardown requires Xcode 6 and above and resulting project works on iOS 8 and above. You should also know the following concepts:
Xcode Basics
You should know your way around Xcode including how to create projects and classes, and access files, navigators and inspectors. You should also know how to create outlets and actions in interface builder (check out the previous teardown if you don't already know this.)
UIKit Basics
You should know how to create views (in code and in Interface Builder) as well as how to manipulate properties on UIView and its subclasses. You should also know how to use Auto Layout.
Game Plan
We'll configure a UITableViewController to display rows of items. Next we'll create a modal transition that performs the expanding effect. Finally we'll have the detail view controller support some of the transition details when scrolling.
Blueprint
Setting up the Initial view
Start a new Xcode project with the Single View Application template. Go into Main.storyboard and add a button and setup up its position with Auto Layout constraints. I've also gone ahead and added some content in the form of an image view to provide some content when we apply the blur effect later.
Next we'll add a class extension to help deal with colors. Add a new file UIColors+FloatingMenu.swift and add the following:
import UIKit

extension UIColor {
    class var flatWhiteColor: UIColor {
        return UIColor(red: 0.9274, green: 0.9436, blue: 0.95, alpha: 1.0)
    }

    class var flatBlackColor: UIColor {
        return UIColor(red: 0.1674, green: 0.1674, blue: 0.1674, alpha: 1.0)
    }

    class var flatBlueColor: UIColor {
        return UIColor(red: 0.3132, green: 0.3974, blue: 0.6365, alpha: 1.0)
    }

    class var flatRedColor: UIColor {
        return UIColor(red: 0.9115, green: 0.2994, blue: 0.2335, alpha: 1.0)
    }
}
We've added a couple of class properties to
UIColorto generate colors we'll use in this project. If you like the swatches, look up the Chameleon library on Github.
Next we'll add a UIButton subclass called FloatingButton. Add the following initialization:
override init(frame: CGRect) {
    super.init(frame: frame)
    setup()
}

required init(coder aDecoder: NSCoder) {
    super.init(coder: aDecoder)
}

override func awakeFromNib() {
    super.awakeFromNib()
    setup()
}

func setup() {
    tintColor = UIColor.whiteColor()
    if backgroundImageForState(.Normal) == nil {
        setBackgroundImage(UIColor.flatBlueColor.pixelImage, forState: .Normal)
    }

    layer.cornerRadius = frame.width/2
    layer.masksToBounds = true
}
We set the
tintColorso if the button is configured using theSystemtype in the storyboard, the image icon is appropriately tinted.
We could have set the backgroundColor property on UIButton to give the impression of a circular button but we wouldn't get the slight dark tint when the button is touched. Instead we set a background image on the button. We can generate a 1x1 point image from a given color using the following computed property. Add this to UIColor+FloatingMenu.swift:
var pixelImage: UIImage {
    let rect = CGRect(x: 0, y: 0, width: 1, height: 1)
    UIGraphicsBeginImageContextWithOptions(rect.size, true, 0)

    self.setFill()
    UIRectFill(rect)

    let image = UIGraphicsGetImageFromCurrentImageContext()
    UIGraphicsEndImageContext()

    return image
}
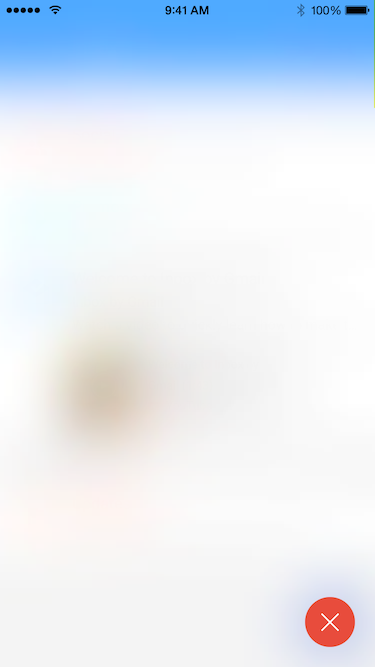
Set the custom class on the button, then build and run and you should see the following:

Adding the Floating Menu controller
Add a new UIViewController subclass called FloatingMenuController. We'll use this class to manage the presentation and dismissal of the menu.
Let's add a property called fromView. This will store the view that triggered the menu - we'll use this for animations later on.
let fromView: UIView

// MARK: UIViewController

init(fromView: UIView) {
    self.fromView = fromView
    super.init(nibName: nil, bundle: nil)

    modalPresentationStyle = .OverFullScreen
    modalTransitionStyle = .CrossDissolve
}

required init(coder aDecoder: NSCoder) {
    fatalError("init(coder:) has not been implemented")
}
Because it's a required parameter and doesn't change, we'll define this with the let keyword so it's a constant. We also add an appropriate initializer. Let's also set the modalPresentationStyle to .OverFullScreen so the system doesn't remove the presenting view controller. We'll also use a modalTransitionStyle of .CrossDissolve so we see a cross-fade when the system transitions into the view controller.
Next we'll add a couple of convenience initializers to FloatingButton:
convenience init(image: UIImage?, backgroundColor: UIColor = UIColor.flatBlueColor) {
    self.init()
    setImage(image, forState: .Normal)
    setBackgroundImage(backgroundColor.pixelImage, forState: .Normal)
}

convenience override init() {
    self.init(frame: CGRect(x: 0, y: 0, width: 50, height: 50))
}
Next we'll add a close button and the blurred background to FloatingMenuController:
let blurredView = UIVisualEffectView(effect: UIBlurEffect(style: .Light))
let closeButton = FloatingButton(image: UIImage(named: "icon-close"), backgroundColor: UIColor.flatRedColor)
We chose the
.Lightstyle for the blur effect but you could also try.ExtraLightand.Dark.
We'll also add a method to configure the position for the close button (to the same position as fromView):
func configureButtons() {
    let parentController = presentingViewController!
    let center = parentController.view.convertPoint(fromView.center, fromView: fromView.superview)

    closeButton.center = center
}
Now we'll add both views in viewDidLoad():
override func viewDidLoad() {
    super.viewDidLoad()

    blurredView.frame = view.bounds
    view.addSubview(blurredView)
    view.addSubview(closeButton)
}
We'll also call our previous configureButtons() method in viewWillAppear() so the close button gets placed correctly right as the view controller appears.
override func viewWillAppear(animated: Bool) {
    super.viewWillAppear(animated)
    configureButtons()
}
Go back to ViewController and add a connection for the button we placed in the storyboard:
@IBAction func handleMenuButton(sender: AnyObject) {
    let controller = FloatingMenuController(fromView: sender as UIButton)
    presentViewController(controller, animated: true, completion: nil)
}
Build and run and you should see the following as you tap the button:
Next we need a way to dismiss the menu. Add the following to FloatingMenuController:
func handleCloseMenu(sender: AnyObject) {
    dismissViewControllerAnimated(true, completion: nil);
}
We'll also add a target to the close button:
override func viewDidLoad() {
    ...

    closeButton.addTarget(self, action: "handleCloseMenu:", forControlEvents: .TouchUpInside)
    view.addSubview(closeButton)
}
Adding the Menu Buttons
Let's add the following enumeration to help calculate where the buttons should be:
enum Direction {
    case Up
    case Down
    case Left
    case Right

    func offsetPoint(point: CGPoint, offset: CGFloat) -> CGPoint {
        switch self {
        case .Up:
            return CGPoint(x: point.x, y: point.y - offset)
        case .Down:
            return CGPoint(x: point.x, y: point.y + offset)
        case .Left:
            return CGPoint(x: point.x - offset, y: point.y)
        case .Right:
            return CGPoint(x: point.x + offset, y: point.y)
        }
    }
}
This state also comes with a convenience method for calculating a position offset in a certain direction.
We'll also add a few public properties to allow the configuration of the menu:
var buttonDirection = Direction.Up
var buttonPadding: CGFloat = 70
var buttonItems = [UIButton]()
We'll configure the menu view controller by setting buttonItems with the buttons we want to display. We have to add these buttons to view hierarchy:
override func viewDidLoad() {
    ...

    for button in buttonItems {
        view.addSubview(button)
    }
}
Let's update the configureButtons() method to also position the buttons:
func configureButtons() {
    let parentController = presentingViewController!
    let center = parentController.view.convertPoint(fromView.center, fromView: fromView.superview)

    closeButton.center = center

    for (index, button) in enumerate(buttonItems) {
        button.center = buttonDirection.offsetPoint(center, offset: buttonPadding * CGFloat(index+1))
    }
}
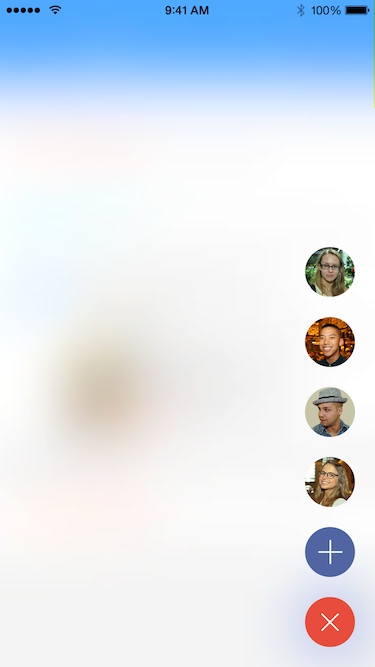
Now in the ViewController class, add some sample buttons:
@IBAction func handleMenuButton(sender: AnyObject) {
    let controller = FloatingMenuController(fromView: sender as UIButton)
    controller.buttonItems = [
        FloatingButton(image: UIImage(named: "icon-add")),
        FloatingButton(image: UIImage(named: "model-008")),
        FloatingButton(image: UIImage(named: "model-007")),
        FloatingButton(image: UIImage(named: "model-004")),
        FloatingButton(image: UIImage(named: "model-005")),
    ]
    presentViewController(controller, animated: true, completion: nil)
}
Build and run and you should see the following:
Let's introduce a delegate for our FloatingMenuController so we can get notified when the buttons are tapped.
@objc
protocol FloatingMenuControllerDelegate: class {
    optional func floatingMenuController(controller: FloatingMenuController, didTapOnButton button: UIButton, atIndex index: Int)
    optional func floatingMenuControllerDidCancel(controller: FloatingMenuController)
}
We need to also add this as a property in the view controller:
var delegate: FloatingMenuControllerDelegate?
Next we'll add the method to handle button taps. We'll simply find the index to our button and then make a call to our delegate.
func handleMenuButton(sender: AnyObject) {
    let button = sender as UIButton
    if let index = find(buttonItems, button) {
        delegate?.floatingMenuController?(self, didTapOnButton: button, atIndex: index)
    }
}
Next we'll update our viewDidLoad() method to add an action to each button:
override func viewDidLoad() {
    ...

    for button in buttonItems {
        button.addTarget(self, action: "handleMenuButton:", forControlEvents: .TouchUpInside)
        view.addSubview(button)
    }
}
We also have to adjust the method handling the close button:
func handleCloseMenu(sender: AnyObject) {
    delegate?.floatingMenuControllerDidCancel?(self)
    dismissViewControllerAnimated(true, completion: nil);
}
Finally we'll have our ViewController implement this protocol to receive callbacks:
class ViewController: UIViewController, FloatingMenuControllerDelegate {
    ...

    // MARK: FloatingMenuControllerDelegate

    func floatingMenuController(controller: FloatingMenuController, didTapOnButton button: UIButton, atIndex index: Int) {
        println("tapped index \(index)")
        controller.dismissViewControllerAnimated(true, completion: nil)
    }
}
Remember to set the view controller as a delegate of the menu controller:
@IBAction func handleMenuButton(sender: AnyObject) {
    let controller = FloatingMenuController(fromView: sender as UIButton)
    controller.delegate = self
    ...
}
Build and run and you should see the message in the console as you tap on the buttons.
Animating the Menu Buttons
Let's update our configureButtons() method to take a state so we can use this method configure buttons in the initial and final state of the animation:
func configureButtons(initial: Bool) {
    let parentController = presentingViewController!
    let center = parentController.view.convertPoint(fromView.center, fromView: fromView.superview)

    closeButton.center = center

    if initial {
        closeButton.alpha = 0
        closeButton.transform = CGAffineTransformMakeRotation(CGFloat(M_PI))

        for (index, button) in enumerate(buttonItems) {
            button.center = center
            button.alpha = 0
            button.transform = CGAffineTransformMakeRotation(CGFloat(M_PI))
        }
    }
    else {
        closeButton.alpha = 1
        closeButton.transform = CGAffineTransformIdentity

        for (index, button) in enumerate(buttonItems) {
            button.center = buttonDirection.offsetPoint(center, offset: buttonPadding * CGFloat(index+1))
            button.alpha = 1
            button.transform = CGAffineTransformIdentity
        }
    }
}
Initially, the buttons are hidden with a slight rotation applied. We handle the rotation by creating a CGAffineTransform value and setting it on the transform property.
We'll add a new method to handle the animation:
func animateButtons(visible: Bool) {
    configureButtons(visible)

    UIView.animateWithDuration(0.4, delay: 0, usingSpringWithDamping: 0.9, initialSpringVelocity: 0, options: .allZeros, animations: { () -> Void in
        [self]
        self.configureButtons(!visible)
    }, completion: nil)
}
We're simply setting an initial configuration to the buttons and setting the final state in an animation block.
Finally we'll call animateButtons() when the view controller appears and disappears:
override func viewWillAppear(animated: Bool) {
    super.viewWillAppear(animated)
    animateButtons(true)
}

override func viewWillDisappear(animated: Bool) {
    super.viewWillDisappear(animated)
    animateButtons(false)
}
Build and run and you should see the following:
Adding labels to the buttons
Add the following properties to FloatingMenuController:
var labelDirection = Direction.Left
var labelTitles = [String]()
var buttonLabels = [UILabel]()
We need to create labels for the titles provided in viewDidLoad():
override func viewDidLoad() {
    ...

    for title in labelTitles {
        let label = UILabel()
        label.text = title
        label.textColor = UIColor.flatBlackColor
        label.textAlignment = .Center
        label.font = UIFont(name: "HelveticaNeue-Light", size: 15)
        label.backgroundColor = UIColor.flatWhiteColor
        label.sizeToFit()
        label.bounds.size.height += 8
        label.bounds.size.width += 20
        label.layer.cornerRadius = 4
        label.layer.masksToBounds = true
        view.addSubview(label)
        buttonLabels.append(label)
    }
}
Next we need make adjustments to configureButtons() to also configure the labels. We can offset the center of the label from the its button position as shown below, equal to buttonPadding/2 + labelSize/2 from the buttonCenter.
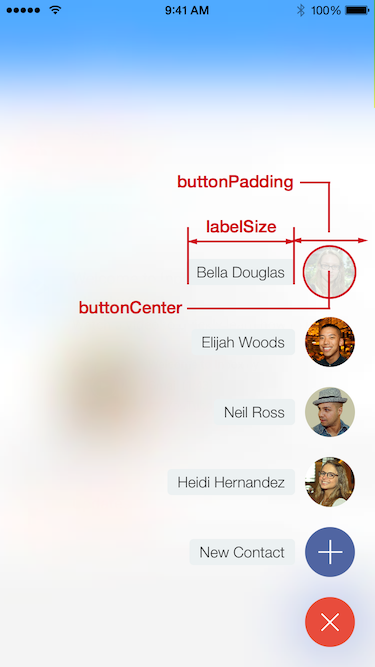
func configureButtons(initial: Bool) {
    ...

    if initial {
        ...

        for (index, label) in enumerate(buttonLabels) {
            let buttonCenter = buttonDirection.offsetPoint(center, offset: buttonPadding * CGFloat(index+1))

            let labelSize = labelDirection == .Up || labelDirection == .Down ? label.bounds.height : label.bounds.width
            let labelCenter = labelDirection.offsetPoint(buttonCenter, offset: buttonPadding/2 + labelSize)
            label.center = labelCenter
            label.alpha = 0
        }
    }
    else {
        ...

        for (index, label) in enumerate(buttonLabels) {
            let buttonCenter = buttonDirection.offsetPoint(center, offset: buttonPadding * CGFloat(index+1))

            let labelSize = labelDirection == .Up || labelDirection == .Down ? label.bounds.height : label.bounds.width
            let labelCenter = labelDirection.offsetPoint(buttonCenter, offset: buttonPadding/2 + labelSize/2)
            label.center = labelCenter
            label.alpha = 1
        }
    }
}
Finally we'll add sample titles so we can see the effect:
@IBAction func handleMenuButton(sender: AnyObject) {
    ...

    controller.labelTitles = [
        "New Contact",
        "Heidi Hernandez",
        "Neil Ross",
        "Elijah Woods",
        "Bella Douglas"
    ]
    presentViewController(controller, animated: true, completion: nil)
}
Build and run and you should see the following:
Afterthoughts
That's it, we've created the Floating Menu effect. You've learnt how to:
- Use and configure
UIVisualEffectViewfor blur effects - Create custom views that can be instaniated programmatically or via storyboard
- Create a generic view controller that provides callbacks via a delegate