My book on iOS interface design, Design Teardowns: Step-by-step iOS interface design walkthroughs is now available!
Design Teardown: Spinning Tips
Tweetbot is hands down my favorite Twitter app on iOS. It features tons of interesting UX elements all around. In particular, there's an awesome effect in the on-boarding process we'll discuss in this post.
The following is a chapter from my upcoming book, Design Teardowns: Step-by-step iOS interface design walkthroughs. If you like this or have a suggestion for another UI teardown, let me know or join my mailing list and get access to the sample code.
Goal
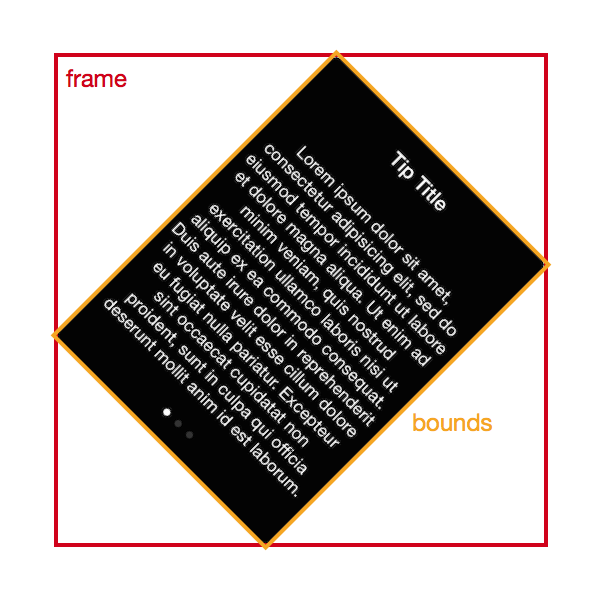
We are going to recreate the spinning tips effect from the onboarding of Tweetbot. The final result looks something like this:

Observations
The tip bounces in from the side.
The onboarding process begins by having the first tip bounce in from the right. The tip also seems to rotate as it comes into view.
Touching anywhere on the screen pulls at the tip.
Pulling anywhere on the screen seems to pull the tip in that direction. Also it seems like the tip moves in such a way that seems to suggest its rotating around a point which is somewhere off-screen.
Moving between tips is fluid.
As one tip moves off-screen, the next appears from the opposite direction in what makes for a really fluid interaction.
Prerequisites
This teardown requires Xcode 6 and above and resulting project works on iOS 8 and above. You should also know the following concepts:
Xcode Basics
You should know your way around Xcode including how to create projects and classes, and access files, navigators and inspectors. You should also know how to create outlets and actions in interface builder (check out the previous teardown if you don't already know this.)
UIKit Basics
You should know how to create views (in code and in Interface Builder) as well as how to manipulate properties on UIView and its subclasses. You should also know how to use Auto Layout.
Game Plan
We'll adopt UIKit's built-in physics system, UIDynamicAnimator and experiment with some of the behaviors available such as UISnapBehavior and UIAttachmentBehavior.
Blueprint
Creating the Model
Create a new Xcode project with the Single View Application template. Next we're going to create the data model that represents each tip. Create a new swift file named Tip.swift and add the following definition:
import UIKit

struct Tip {
    let title: String
    let summary: String
    let image: UIImage?
}
This simple model includes properties for the tip's title, summary and image to be displayed. We've chosen to make the image property optional which will make it easier to work with UIKit.
Creating the UI
Next we will create the view hierarchy to display the above model properties. Create a new file, select the template from iOS, User Interface, View.
Add 2 labels, an image view and a page control as follows:
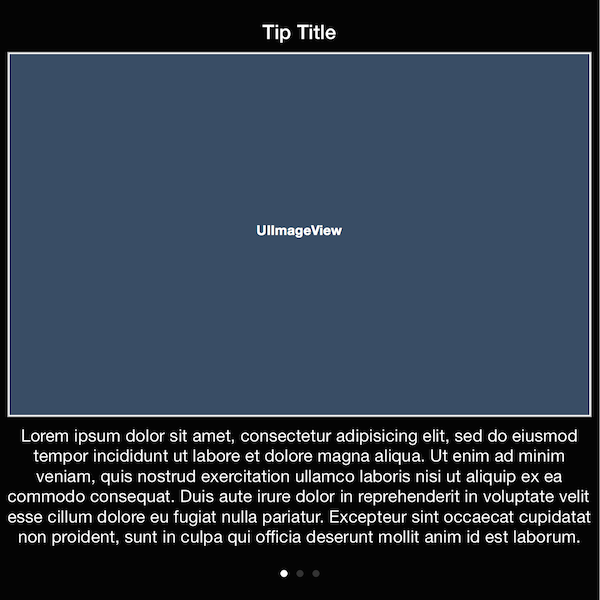
Note the mode for the image view has been set to Aspect Fill and the vertical Content Compression Resistance in the Size Inspector to be lower than that of the next label (this will allow the image view to shrink before the label does).
The number of lines in the second label is set to 0 to allow word wrap. Add the relevant Auto Layout constraints to allow the view to adapt to any arbitrary size.
Next we will create a backing subclass for this view. Create a new subclass of UIView called TipView.
Add the following outlets to the class by setting up the connections with Interface Builder:
@IBOutlet weak var titleLabel: UILabel!
@IBOutlet weak var summaryLabel: UILabel!

@IBOutlet weak var imageView: UIImageView!
@IBOutlet weak var pageControl: UIPageControl!
Add the following property of our data model Tip and the corresponding property observer to update our subviews accordingly:
var tip: Tip? {
    didSet {
        titleLabel.text = tip?.title ?? "No Title"
        summaryLabel.text = tip?.summary ?? "No Summary"
        imageView.image = tip?.image
    }
}
Note the ?? operator (also known as the coalescing operator). We can use this operator to provide default values when there is no model available.
Next we'll add rounded corners to the this view:
override func layoutSubviews() {
    super.layoutSubviews()
    layer.cornerRadius = 10
    layer.masksToBounds = true
}
Setting up the View Controller
Now we are ready to present our tips. We want a general way to do this so we can present tips from any screen in the application. In order to do this, we'll create a dedicated view controller for displaying tips and then present this view controller from wherever we require.
Create TipViewController as a subclass of UIViewController.
Next we'll add couple of constants to keep track of some layout attributes:
private let kTipViewHeight: CGFloat = 400
private let kTipViewWidth: CGFloat  = 300
Now when the view controller loads, we will create a TipView and display it on the screen. First add this utility method that creates a tip view and configures it:
func createTipView() -> TipView? {
    if let view = UINib(nibName: "TipView", bundle: nil).instantiateWithOwner(nil, options: nil).first as TipView? {
        view.frame = CGRect(x: 0, y: 0, width: kTipViewWidth, height: kTipViewHeight)
        return view
    }
    return nil
}
UINibgives us programmatic access to the Interface Builder xib file we created earlier. Instantiating this file gives us an array of objects and we are interested in the first (and only) top level view.
Next what we need to do is to simply center the view in the middle of the screen and add it to the view hierarchy:
override func viewDidLoad() {
    super.viewDidLoad()
    if let tipView = createTipView() {
        var center = CGPoint(x: CGRectGetWidth(view.bounds)/2, y: CGRectGetHeight(view.bounds)/2)
        tipView.center = center
        view.addSubview(tipView)
    }
}
We're almost ready to test out our work so far. Before that, we'll add a convenience method to present the tip view controller. Add the following below the entire class definition:
extension UIViewController {
    func presentTips(tips: [Tip], animated: Bool, completion: (() -> Void)?) {
        let controller = TipViewController()
        controller.modalTransitionStyle = .CrossDissolve
        presentViewController(controller, animated: animated, completion: completion)
    }
}
Extensions are a way of adding new functionality to existing types and classes in Swift. They are almost equivalent to Categories in Objective-C.
This makes it as easy to present tips as presenting a regular modal view controller on UIViewController.
We're simply going to take an array of tips to display (but we are not yet doing anything to display them) and configure the type of model presentation we need. Using a presentation transition of CrossDissolve will simply fade the tips view controller into view.
Back in ViewController.swift we will display the tips view controller immediately on launch:
override func viewDidAppear(animated: Bool) {
    super.viewDidAppear(animated)
    presentTips([], animated: true, completion: nil)
}
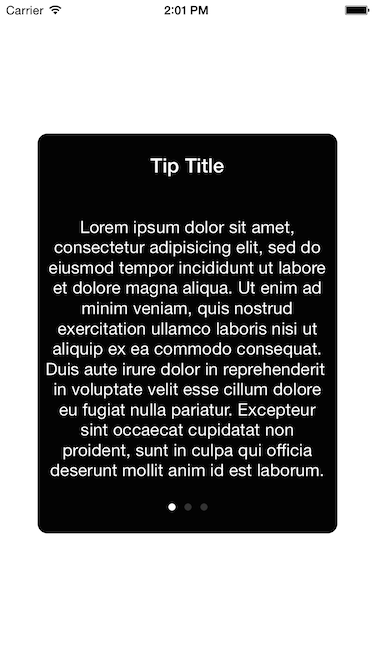
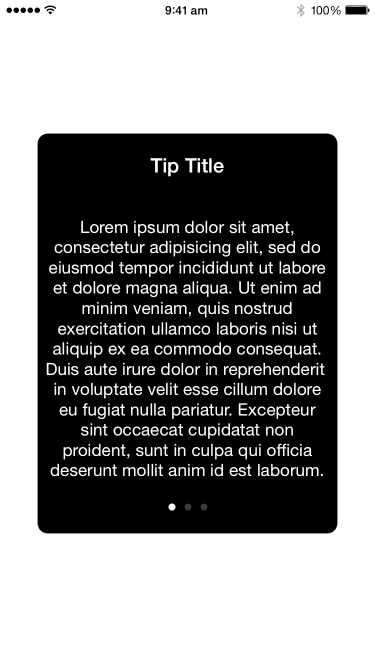
Build and run the project and you should see the following:
Adding the animations
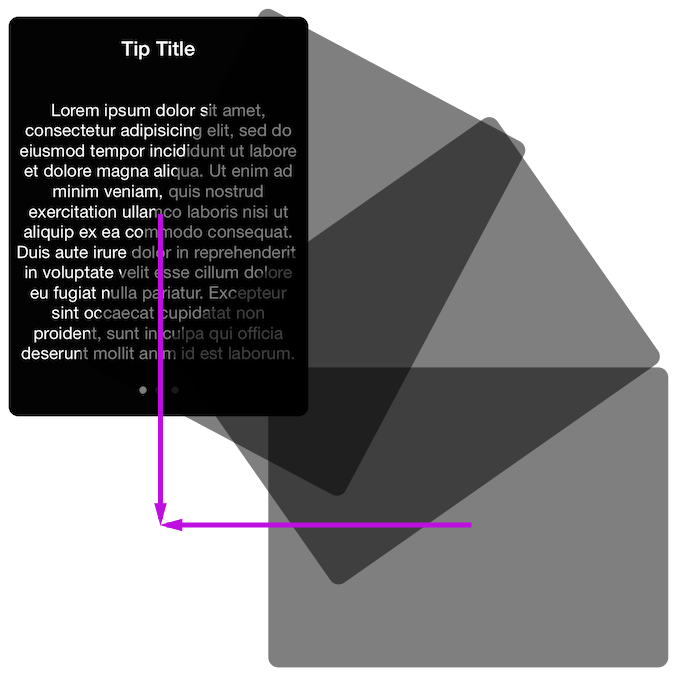
To recreate the effect in Tweetbot, we will place the initial tip off-screen and rotated, and then have it snap back into the center of the screen:
To do this, we'll first add a couple of properties to our view controller:
var tipView: TipView!
var animator: UIDynamicAnimator!
var attachmentBehavior: UIAttachmentBehavior!
var snapBehavior: UISnapBehavior!
These properties will hold references to the tip view and the necessary physics constraints.
We'll also add another constant to hold the offset parameter about which the tip view rotates around:
private let kTipViewOffset: CGFloat = 500
Next we will create an enumeration to hold the states of the tip view that we're interested in:
enum TipViewPosition: Int {
    case Default
    case RotatedLeft
    case RotatedRight

    func viewCenter(var center: CGPoint) -> CGPoint {
        switch self {
        case .RotatedLeft:
            center.y += kTipViewOffset
            center.x -= kTipViewOffset

        case .RotatedRight:
            center.y += kTipViewOffset
            center.x += kTipViewOffset

        default:
            ()
        }

        return center
    }

    func viewTransform() -> CGAffineTransform {
        switch self {
        case .RotatedLeft:
            return CGAffineTransformMakeRotation(CGFloat(-M_PI_2))

        case .RotatedRight:
            return CGAffineTransformMakeRotation(CGFloat(M_PI_2))

        default:
            return CGAffineTransformIdentity
        }
    }
}
The enumeration also has some convenience methods for calculating the center and transform of the tip view.
We're using a
CGAffineTransformas a means of specifying the rotation. This is usually represented as a transformation matrix. However, for our purposes, we are going to treat this as an opaque value (and just use the provided functions to manipulate it.)
Next we will add methods to place the tip view in position. The method updateTipView() simply sets the center and transform properties on the tip view:
func updateTipView(tipView: UIView, position: TipViewPosition) {
    var center = CGPoint(x: CGRectGetWidth(view.bounds)/2, y: CGRectGetHeight(view.bounds)/2)
    tipView.center = position.viewCenter(center)
    tipView.transform = position.viewTransform()
}
The next one resetTipView() removes all behaviors from the physics engine, updates the tip view position and updates the physics engine with new position. We then add back the necessary behaviors.
func resetTipView(tipView: UIView, position: TipViewPosition) {
    animator.removeAllBehaviors()

    updateTipView(tipView, position: position)
    animator.updateItemUsingCurrentState(tipView)

    animator.addBehavior(attachmentBehavior)
    animator.addBehavior(snapBehavior)
}
We use
updateItemUsingCurrentStateto reset the animator's state to the view's current state. This works best if no behaviors are attached.
Next we will add a method to setup the physics engine:
func setupAnimator() {
    animator = UIDynamicAnimator(referenceView: view)

    var center = CGPoint(x: CGRectGetWidth(view.bounds)/2, y: CGRectGetHeight(view.bounds)/2)

    tipView = createTipView()
    view.addSubview(tipView)
    snapBehavior = UISnapBehavior(item: tipView, snapToPoint: center)

    center.y += kTipViewOffset
    attachmentBehavior = UIAttachmentBehavior(item: tipView, offsetFromCenter: UIOffset(horizontal: 0, vertical: kTipViewOffset), attachedToAnchor: center)

    resetTipView(tipView, position: .RotatedRight)
}
We've created the animator and assigned our view controller's root view to be the reference view (for calculation in the physics simulations.)
Next we've created a snap behavior that will bring the tip view back into the center of the root view. Most importantly we've created an attachment behavior (which you can imagine as sort of invisible string) that connects the tip view to an imaginary point of distance kTipViewOffset directly below it.
Now clear out the previous testing code in viewDidLoad() and add the following to viewDidAppear():
override func viewDidAppear(animated: Bool) {
    super.viewDidAppear(animated)
    setupAnimator()
}
Build and run the project and you should see the following:
Now we notice a slight quirk. Auto Layout is resizing the contents of our tip view during the animation.
As the tip view is rotating, its frame is significantly larger than its bounds (it's the smallest rectanglar region that will fit the view within it). Since Auto Layout sizes views according to their frames, it incorrectly assumes it has a larger space to lay things out.
To correct this we need to supply the method alignmentRectForFrame() in the view subclass. Add the following to TipView:
override func alignmentRectForFrame(frame: CGRect) -> CGRect {
    return bounds
}
Build and run and things should look right:
Adding the interactions
To handle the dragging interaction, we'll create a pan gesture recognizer and add it to the view controller's root view. Add the following to the bottom of setupAnimator:
let pan = UIPanGestureRecognizer(target: self, action: "panTipView:")
view.addGestureRecognizer(pan)
Add a new property to contain the attachment behavior managed by the pan gesture:
var panBehavior: UIAttachmentBehavior!
Next we'll add the method to handle updates when the pan gesture is triggered. We need to do a few things:
When the pan gesture begins, we remove the snap behavior (so we can move the tip view without it snapping back to the center of the screen). We then create an attachment behavior anchored to the touch location.
As the pan gesture continues, we change the anchor of the previous attachment behavior to the current touch location. This will adjust the tip view position until it satisfies both attachment constraints (the initial one with the offset distance and this panning one).
When the pan gesture stops (it either ends or is cancelled by the system), we have to decide if we should proceed with the transition or cancel it. One way to do this is to just look at how far we have moved (the offset from the center).
If we cancel the transition, we remove the pan gesture's attachment behavior and add the snap behavior back to the view (which will snap it back to the center of the screen).
If we proceed with the transition, we first change the attachment's anchor to be off-screen in the right direction to animate the view away. Next we call
resetTipViewto bring it back on-screen from the opposite direction.
func panTipView(pan: UIPanGestureRecognizer) {
    let location = pan.locationInView(view)

    switch pan.state {
    case .Began:
        animator.removeBehavior(snapBehavior)
        panBehavior = UIAttachmentBehavior(item: tipView, attachedToAnchor: location)
        animator.addBehavior(panBehavior)

    case .Changed:
        panBehavior.anchorPoint = location

    case .Ended:
        fallthrough
    case .Cancelled:
        let center = CGPoint(x: CGRectGetWidth(view.bounds)/2, y: CGRectGetHeight(view.bounds)/2)
        let offset = location.x - center.x
        if fabs(offset) < 100 {
            animator.removeBehavior(panBehavior)
            animator.addBehavior(snapBehavior)
        }
        else {
            let position = offset > 0 ? TipViewPosition.RotatedRight : TipViewPosition.RotatedLeft
            let nextPosition = offset > 0 ? TipViewPosition.RotatedLeft : TipViewPosition.RotatedRight
            let duration = 0.4

            let center = CGPoint(x: CGRectGetWidth(view.bounds)/2, y: CGRectGetHeight(view.bounds)/2)

            panBehavior.anchorPoint = position.viewCenter(center)
            dispatch_after(dispatch_time(
                DISPATCH_TIME_NOW, Int64(duration * Double(NSEC_PER_SEC))), dispatch_get_main_queue()) {
                    [self]
                    self.resetTipView(self.tipView, position: nextPosition)
            }
        }

    default:
        ()
    }
}
The empty parentheses
()are the simpliest way to include a statement in Swift. We use this to provide no operation in thedefaultcase.
Build and run and try to move the tip view around:
Making the Model Work
Finally we're ready to use actual tips. Let's add some sample data to the our presenting view controller in ViewController.swift:
presentTips([
      Tip(title: "Tip #1: Don't Blink", summary: "Fantastic shot of Sarah for the ALS Ice Bucket Challenge - And yes, she tried her hardest not to blink!", image: UIImage(named: "als-ice-bucket-challenge")),
      Tip(title: "Tip #2: Explore", summary: "Get out of the house!", image: UIImage(named: "arch-architecture")),
      Tip(title: "Tip #3: Take in the Moment", summary: "Remember that each moment is unique and will never come again.", image: UIImage(named: "man-mountains"))
], animated: true, completion: nil)
Add the following properties to TipViewController to keep track of the tips and which one is being shown:
var tips = [Tip]()
var index = 0
Now we've got to remember to save the tips away as our view controller is presented:
func presentTips(tips: [Tip], animated: Bool, completion: (() -> Void)?) {
    let controller = TipViewController()
    controller.tips = tips

    ...
}
Next we need to setup the view given an instance of the Tip data model. We also need to adjust the page control accordingly. Add this method to the TipViewController to setup the tip view given an index into our list of tips:
func setupTipView(tipView: TipView, index: Int) {
    if index < tips.count {
        let tip = tips[index]
        tipView.tip = tip

        tipView.pageControl.numberOfPages = tips.count
        tipView.pageControl.currentPage = index
    }
    else {
        tipView.tip = nil
    }
}
Let's load the very first tip when we setup the animator:
func setupAnimator() {
    ...

    setupTipView(tipView, index: 0)
    resetTipView(tipView, position: .RotatedRight)

    ...
}
Finally we need to handle moving between tips as we interact with the tip view. Add the following the .Changed state of the pan gesture method:
...
else {
    var nextIndex = self.index
    var position = TipViewPosition.RotatedRight
    var nextPosition = TipViewPosition.RotatedLeft

    if offset > 0 {
        nextIndex -= 1
        nextPosition = .RotatedLeft
        position = .RotatedRight
    }
    else {
        nextIndex += 1
        nextPosition = .RotatedRight
        position = .RotatedLeft
    }

    if nextIndex < 0 {
        nextIndex = 0
        nextPosition = .RotatedRight
    }

    let duration = 0.4
    let center = CGPoint(x: CGRectGetWidth(view.bounds)/2, y: CGRectGetHeight(view.bounds)/2)

    panBehavior.anchorPoint = position.viewCenter(center)

    dispatch_after(dispatch_time(
        DISPATCH_TIME_NOW, Int64(duration * Double(NSEC_PER_SEC))), dispatch_get_main_queue()) {
            [self]
            if nextIndex >= self.tips.count {
                self.dismissViewControllerAnimated(true, completion: nil)
            }
            else {
                self.index = nextIndex
                self.setupTipView(self.tipView, index: nextIndex)
                self.resetTipView(self.tipView, position: nextPosition)
            }
    }
}
If we try to swipe to the previous tip when we are already at the first tip, we simply want to bounce back. If we try to swipe after the last one, we'll dismiss the tip view controller.
We can improve the visual effect by making the presenting view controller slightly visible. Make the tips view controller's background color semi-transparent:
override func viewDidLoad() {
    super.viewDidLoad()
    view.backgroundColor = UIColor(white: 0, alpha: 0.5)
}
Add the following bit to presentTips() in our UIViewController extension:
func presentTips(tips: [Tip], animated: Bool, completion: (() -> Void)?) {
    ...

    controller.modalPresentationStyle = .OverFullScreen
    controller.modalTransitionStyle = .CrossDissolve
    presentViewController(controller, animated: animated, completion: completion)
}
By specifying
OverFullScreenas themodalPresentationStyle, we are telling the system to keep the presenting view controller in the view hierarchy. Without this, you'd just see a black background.
Now build and run and you should see the following:

Afterthoughts
That's it, we've created the Spinning Tips effect. You've learnt how to:
- Setup and configure
UIDynamicAnimator - Use attachments and snap behaviors
- Create a view controller that can be used generally
Next Steps
To add more polish you can try the following:
- Experiment with
resistanceproperty ofUIDynamicItemBehaviorto adjust the speed of the animation according to thevelocityof the pan gesture.
If you liked this teardown, want to receive updates on the book, or want to play with the sample code subscribe to my mailing list (your email will not be shared):